Installation Guide
🇷🇺 Русский | 🇬🇧 English
📜 Step-by-Step Guide
🐳 Quick Start: Docker (recommended)
Requirements: Docker and Docker Compose
git clone https://github.com/fedorabakumets/telegram-bot-builder.git
cd telegram-bot-builder
docker compose up -d
docker compose logs -f
Useful commands:
docker compose down        # Stop
docker compose build --no-cache  # Rebuild
docker compose logs -f     # Logs
✅ Done! App available at: http://localhost:5000
Manual Installation
Requirements
- Node.js ≥ 18.0.0
- PostgreSQL ≥ 17
- Redis ≥ 7
- Python ≥ 3.10 (3.13 recommended, for generated bots)
- Git
Step 1: Install Git
| 🐧 Linux (Ubuntu/Debian) | 🏁 Windows | 🍎 macOS |
|---|---|---|
|
Option 1: Via terminal (recommended): Ubuntu/Debian: Fedora/CentOS: Arch Linux: Option 2: From website:
Verify installation: |
Option 1: Via winget (recommended): Option 2: Via installer:
Verify installation:
Open PowerShell as administrator (
|
Option 1: Via Homebrew (recommended): Option 2: From website:
Verify installation:
|
Step 2: Install Node.js LTS
| 🐧 Linux | 🏁 Windows | 🍎 macOS |
|---|---|---|
|
Option 1: Via terminal (recommended): Option 2: From website:
|
Option 1: Via winget: Option 2: From website:
|
Option 1: Via Homebrew: Option 2: From website:
|
Step 3: Install PostgreSQL
| 🐧 Linux | 🏁 Windows | 🍎 macOS |
|---|---|---|
|
Option 1: Via terminal: Option 2: Official repository:
|
Option 1: Via winget (recommended):
Verify installation: Option 2: From website:
|
Option 1: Via Homebrew: Option 2: From website:
|
Step 4: Install Python 3
| 🐧 Linux | 🏁 Windows | 🍎 macOS |
|---|---|---|
|
Option 1: Via terminal: Option 2: Official website:
|
Option 1: Via winget: Option 2: From website:
|
Option 1: Via Homebrew: Option 2: From website:
|
Step 5: Install Redis
| 🐧 Linux (Ubuntu/Debian) | 🏁 Windows | 🍎 macOS |
|---|---|---|
|
Option 1: Via terminal: Verify installation:
|
Option 1: Memurai (recommended for Windows): Memurai is a native Windows port, fully compatible with Redis 7.2+. It installs as a Windows service and works without WSL. After installation, the service starts automatically. Management: Option 2: Via WSL2: Install Redis inside WSL: Option 3: Docker: Verify installation:
|
Option 1: Via Homebrew: Verify installation:
|
Step 6: Database Setup
| 🐧 Linux | 🏁 Windows | 🍎 macOS |
|---|---|---|
|
|
|
Step 7: Clone the Project
| 🐧 Linux | 🏁 Windows | 🍎 macOS |
|---|---|---|
|
|
|
Step 8: Environment Setup
1. Copy the template:
| 🐧 Linux | 🏁 Windows | 🍎 macOS |
|---|---|---|
|
|
|
2. Minimal variables for local development:
NODE_ENV=development
PORT=5000

# PostgreSQL
DATABASE_URL=postgresql://postgres:postgres@localhost:5432/telegram_bot_builder

# Redis (Memurai on Windows, redis on Linux/macOS)
REDIS_URL=redis://localhost:6379

# Session signing secret
SESSION_SECRET=any-random-string-for-local

# Admin panel and OpenAPI docs login key
ADMIN_API_KEY=any-random-string-for-local
🔐 SESSION_SECRET is mandatory in production. In
developmentyou may use any string (or omit it entirely — a dev fallback with a warning is used). But inNODE_ENV=productionthe app intentionally refuses to start ifSESSION_SECRETis missing: without it anyone could forge a session cookie and log in as another user. Generate a strong random value:Changing
SESSION_SECRETinvalidates all active sessions — users will need to log in again.
🔑 ADMIN_API_KEY is required in production for the admin panel and protected OpenAPI docs. In
developmentyou may omit it — the insecure dev fallbackdev-only-insecure-admin-keyis used (with a log warning). In production withoutADMIN_API_KEY,/adminand/admin/docsare not mounted. Generate a separate value the same way asSESSION_SECRET.
📖 API documentation:
Mode URL Access Development http://localhost:5000/docsPublic (for local work) Development http://localhost:5000/adminKey from ADMIN_API_KEY(or dev fallback)Production https://your-domain/admin/loginADMIN_API_KEYonlyProduction https://your-domain/admin/docsAfter login: Swagger, Scalar, Redoc, RapiDoc OpenAPI spec:
/docs-json(dev) or/admin/openapi.json(prod, after login).
💡 Telegram Login is configured via Setup Wizard on first launch — no manual setup needed.
Step 9: Install Dependencies and Run
1. Install Node.js dependencies:
npm install
2. Install Python dependencies (for running bots):
pip install -r requirements.txt
3. Run the application:
| Mode | Command | Description |
|---|---|---|
| 🧪 Development | npm run dev | Run with auto-reload on changes |
| 🚀 Production | npm run build → npm run start | Build and run the production version |
✅ Done! App available at: http://localhost:5000
After startup you also have:
- Editor:
http://localhost:5000 - OpenAPI (dev):
http://localhost:5000/docs— UI hub - Admin:
http://localhost:5000/admin/login— key fromADMIN_API_KEY(ordev-only-insecure-admin-keyif unset)
Step 10: Telegram Login Setup (Setup Wizard)
⚠️ For local development (
NODE_ENV=development) this step is optional — the app works without authentication. Setup Wizard is only needed for production deployment.
On first launch in production, the Setup Wizard will appear — it will ask you to enter credentials for Telegram authentication.
How to get credentials from BotFather:
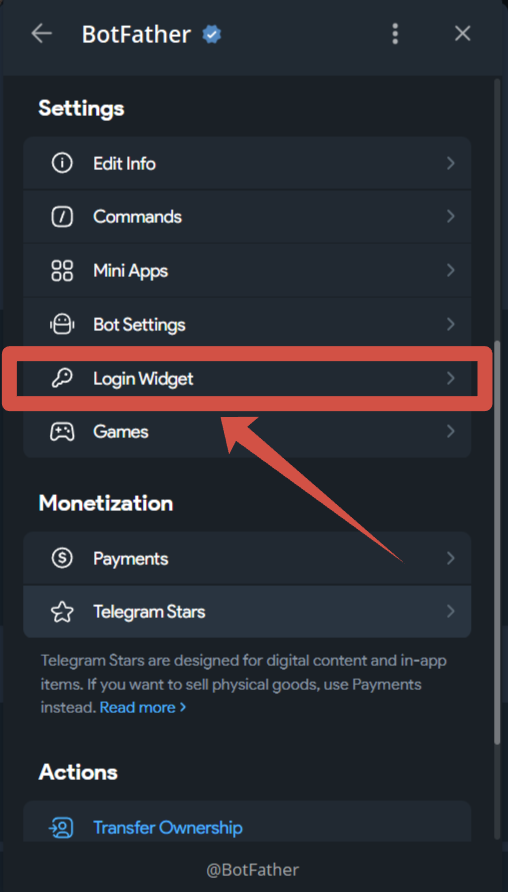
1. Open @BotFather → select your bot → Bot Settings → Login Widget
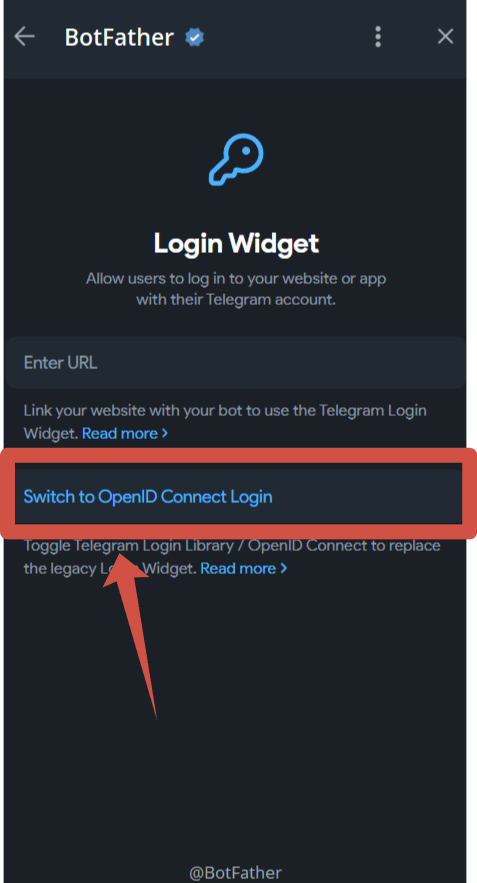
2. Switch to OIDC:
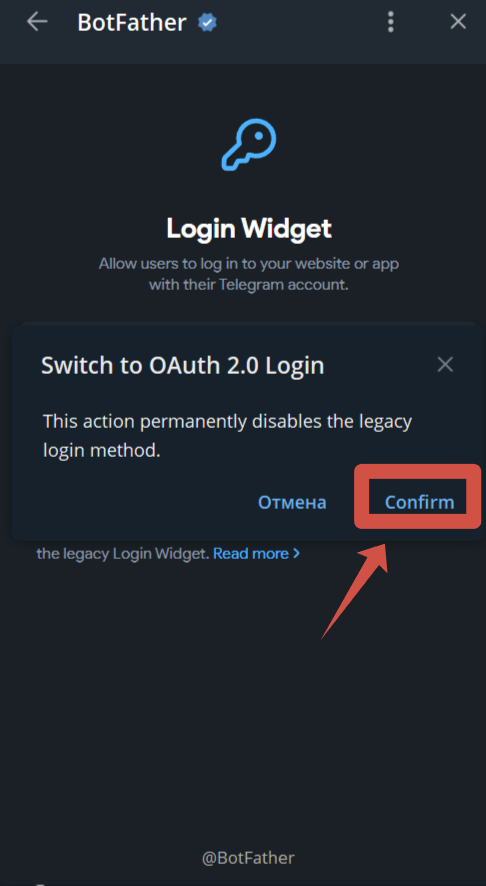
3. Confirm the switch:
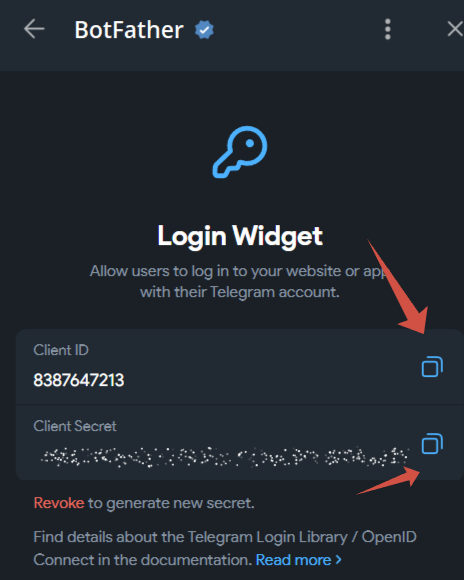
4. Copy the Client ID and Client Secret:
5. Set the Redirect URIs (your application address):
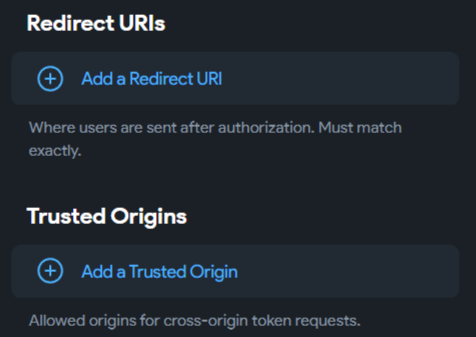
For local development:
http://localhost:5000
6. Enter the obtained credentials in the Setup Wizard:
- Client ID — numeric ID
- Client Secret — secret key
- Bot Username — bot name without @
✅ After saving, the application is ready to use!
Step 11: Connect an AI agent via MCP (optional)
💡 You only need this step if you want to connect an AI agent (Kiro / Cursor / Claude Desktop) to edit bots on the canvas in real time. It is not required for normal use.
The MCP agent is identified by a personal access token (PAT) — like a GitHub/n8n API key. The token is tied to your account and grants access only to your own projects.
1. Open a project → "Agent" tab → "Create token" button.
2. Set a name (e.g. "Kiro on laptop") → "Create".
3. The full mcp_… token is shown exactly once — copy it immediately. Only an sha-256 hash is stored in the database; the secret is never shown again.
4. Copy the ready-made snippet — default is Remote URL (no repo clone). Paste into your MCP client config:
{
  "mcpServers": {
    "botcraft-builder": {
      "url": "https://<your-domain>/mcp",
      "headers": {
        "Authorization": "Bearer mcp_..."
      }
    }
  }
}
For local development (repo clone required), the Agent tab also has a Stdio snippet:
{
  "mcpServers": {
    "botcraft-builder": {
      "command": "npm",
      "args": ["run", "mcp:bot-builder"],
      "cwd": "<path to project directory>",
      "env": {
        "API_BASE_URL": "http://localhost:5000",
        "MCP_AGENT_TOKEN": "mcp_..."
      }
    }
  }
}
- Remote details: docs/mcp/remote-http.md.
- Treat the Bearer /
MCP_AGENT_TOKENlike a password; never commit it.- You can revoke the token instantly on the Agent tab.
- Server flag:
MCP_HTTP_ENABLED(enabled by default).
💡 Need to update the project? See 🔄 How to Update from GitHub